
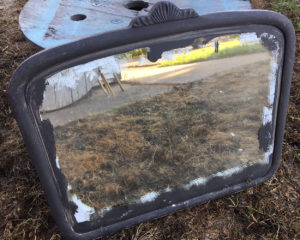
 Ever run across an old vintage piece at a garage or estate sale that was clearly separated from the rest of “what it was made to go with”? Ditto. Take this mirror, for instance. Someone had already gone through the steps of priming and giving it a base coat of black, so that was sweet. And, it was just five bucks. Dude. Score!
Usually when you run across a piece like this, it’s got goop and cobwebs on it, so you’ve got to clean it. Then you’ve got to sand it. Next, you’ve got to prime it. And so on and so forth. This was a totally fab find.
Note that when you find a piece like this that hasn’t been “prepped” for you, you’ll need to clean, sand and prime it. After it’s completely dried, roll or brush on a coat of regular flat black latex paint. Then carry on with the steps outlined below.
Supplies you’ll need:
A vintage solid wood mirror (or old window)
Paper Riot Laundry Room Wall Decals
DecoArt Chalk Acrylic – Vintage
Bristly Paint Brush (normally I don’t recommend cheap brushes on purpose, but this time it’s necessary)
Razor Blade (for scraping excess paint from mirror surface)
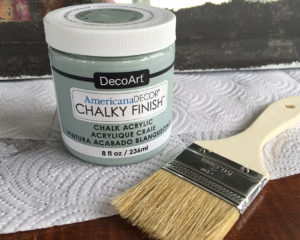 Step 1: First, you’ll need some paint and a brush.
I chose Chalky Finish Acrylic by DecoArt in Vintage color. I found mine at Home Depot on a turnstile on the counter in the paint department. Shake up jar per instructions on jar.
Remove the plastic wrap from the paintbrush (although, if you did leave it on it could possibly make for a fab new finish when applying paint)!
Step 2: Next, you’ll dip the brush lightly into paint jar.
After you’ve dipped the bristles into the jar (approximately 1/2″ in), wipe a good bit of the paint off by dragging the brush along the rim of the jar. Flip the brush over and do this again with the other side.
 Step 3: Next, you’ll “dry brush” the paint on.
Drag the brush lightly over the black surface of the mirror. You’ll notice that you can see “peeks” of the black here & there through the blue. That’s how we get our “aged” finish.
Finish dry brushing the rest of the mirror until you’ve got a finish you love. Allow to dry thoroughly. We recommend overnight. Should you choose to, you can also lightly sand at this point to add some distressing, too. I did not.
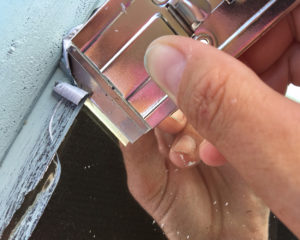 Step 4: Next, you’ll need to scrape off the extra paint.
Using a razor blade, scrape off the excess paint that was brushed onto the surface of the mirror. Check in the paint section of your favorite store. They make tools specific for paint scraping similar to the one that’s shown in the pic to the right.
Step 5: Next, you’ll apply polycrylic sealer.
Brush polycrylic sealer (I use satin finish almost always) over entire blue surface of mirror. This will seal and protect your paint in the event of a bump, drop or scrape. I highly recommend not skipping this step.
Step 6: Lastly, you’ll adhere the decals.
Trim decals from the playbook and arrange them on the mirror where you would like them adhered. Once you love how it looks, gently peel decals from backing and apply. We recommend using a yardstick laid across the mirror horizontally as a guide while applying.
Happy upcycling – Get Your Riot On!